
티스토리 뷰

iOS 13이하에는 인덱스 기반으로 CollectionView와 TableView를 다루었다면, iOS 13 이상부터는 레이아웃과 데이터기반으로 구성할 수 있는 방법이 등장하였다.
1. 레이아웃 만들기
let collectionView = UICollectionView(frame: .zero, collectionViewLayout: createLayout())private func createLayout() -> UICollectionViewLayout {
var configuration = UICollectionLayoutListConfiguration(appearance: .plain)
configuration.backgroundColor = .clear
return UICollectionViewCompositionalLayout.list(using: configuration)
}
기존(iOS 13-)에서는 FlowLayout을 사용했다면, Compositional layout을 구성하기 위해 UICollectionLayoutListConfiguration을 사용하여 레이아웃을 구성한다.
configuration 사용 방법은 button의 configuration과 유사하다. 구조체이기 때문에 var로 선언해준다.
UICollectionViewCompositionalLayout는 UICollectionViewLayout을 상속받고 있기 때문에 적용이 가능하다.
2. delegate, dataSource 없애기
CompositionalLayout기반 collectionView를 구현할 때에는 delegate와 dataSource를 사용하지 않는다.(섞어 써도 가능하다고는 한다.)
override viewDidLoad(){
	super.viewDidLoad()
    tableView.delegate = self //필요없음!
    tableView.dataSource = self //필요없음!
}
index out of range 문제를 해결하기 위해(numberOfItemsInSection과 cellForItemAt의 불일치를 막기 위해) Diffable DataSource가 나온것이다.
delegate와 dataSource는 indexPath.row를 기반으로 하기 때문에, 데이터 기반의 collectionView를 구현할때는 필요없다.
기존에 delegate와 dataSource를 채택하면 기본적으로 구현해야 하는 함수 두개가 있다.
extension SimpleTableViewController: UITableViewDelegate, UITableViewDataSource {
    func tableView(_ tableView: UITableView, numberOfRowsInSection section: Int) -> Int {
        return 10
    }

    func tableView(_ tableView: UITableView, cellForRowAt indexPath: IndexPath) -> UITableViewCell {
        let cell = tableView.dequeueReusableCell(withIdentifier: "cell", for: indexPath)
        return cell
    }
}
위 함수 두개 대신 아래의 코드를 작성한다.
// numberOfItemsInSection, cellForItemAt
//UICollectionViewDataSource >> UICollectionViewDiffableDataSource<Section,Cell>
//UICollectionViewDiffableDataSource<섹션을 구분해 줄 데이터 타입, 셀에 들어가는 데이터타입>
//dataSource는 클래스 타입!! 기존까지 사용하던 dataSource는 프로토콜이다.
var dataSource: UICollectionViewDiffableDataSource<Section, Menu>!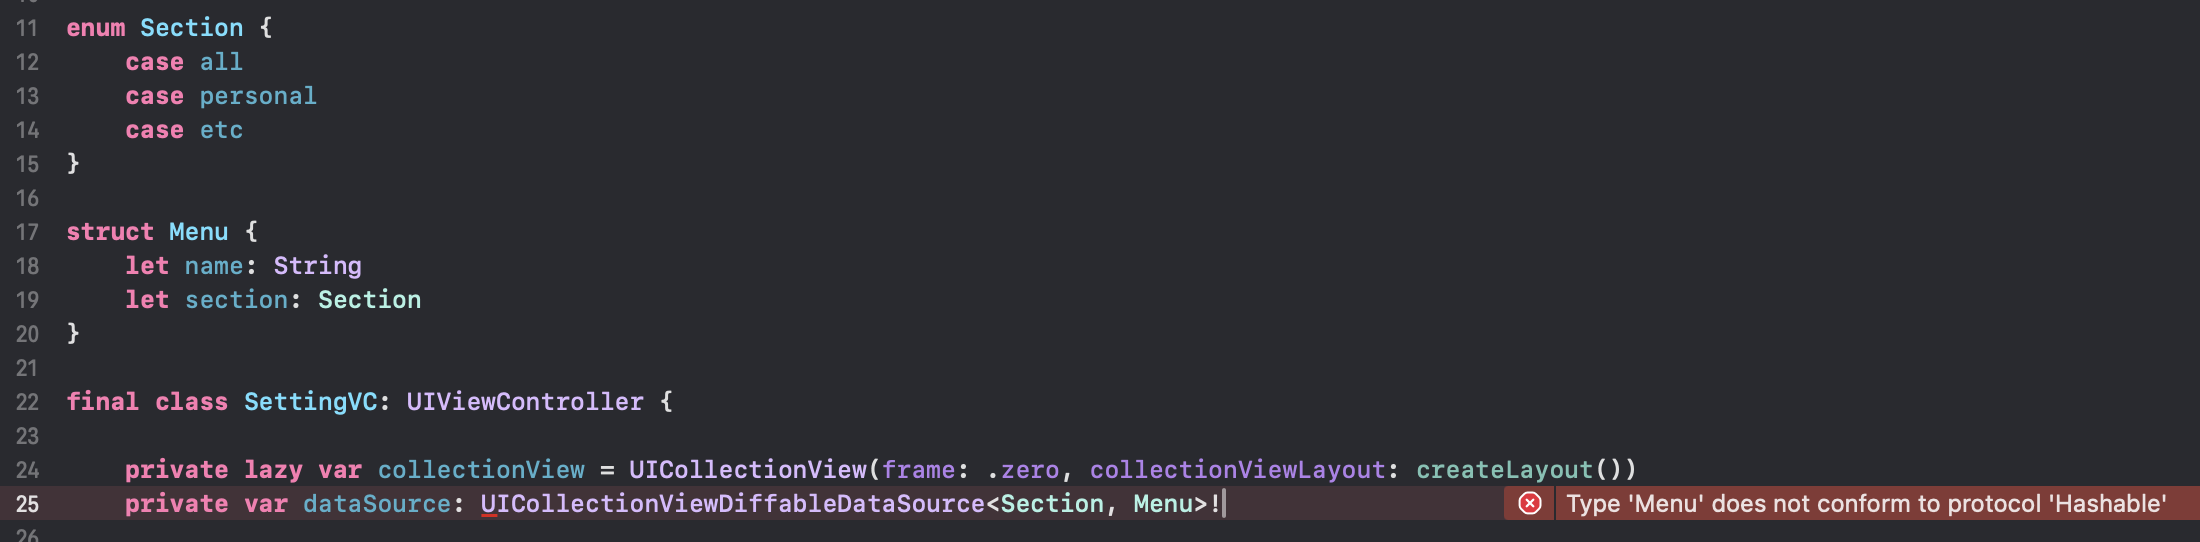
사용자 Custom Struct를 사용하면 위의 사진과 같은 오류가 나오는데, 인덱스를 기반으로 데이터를 구별하는게 아니기 때문에 struct에 Hashable을 채택하여 준다. (그러면 오류가 사라진다.)
delegate와 datasource를 사용하는 대신 UICollectionView의 CellRegistration의 핸들러를 사용하여 구성해준다.

registration 핸들러에는 cell, indexPath, itemIdentifier을 넘겨받는다.
- cell: cell에 대한 설정을 할 수 있음(configuration을 통해 설정을 해준다.)
- UIListContentConfiguration: cell에 들어가는 UI를 설정
- UIBackgroundConfiguration: cell의 차지하는 영역의 설정
- indexPath: indexPath이다.
- itemIdentifier: 넘겨받은 데이터이다.
그리고 dataSource에 넣어준다. 아래는 configureDataSource의 전체코드이다.
//itemIdentifier: cellForItemAt에서 item으로 넘겨준 데이터를 넘겨받음
private func configureDataSource(){
    let registration: UICollectionView.CellRegistration<UICollectionViewCell, String?> = UICollectionView.CellRegistration { cell, indexPath, itemIdentifier in
        guard let item = itemIdentifier else { return }

        var content = UIListContentConfiguration.valueCell()
        content.text = item
        content.textProperties.font = .systemFont(ofSize: 14, weight: .bold)

        cell.contentConfiguration = content
    }

    dataSource = UICollectionViewDiffableDataSource(collectionView: collectionView){ collectionView, indexPath, itemIdentifier in
        let cell = collectionView.dequeueConfiguredReusableCell(using: registration, for: indexPath, item: itemIdentifier)
        return cell
    }
}
3. 데이터를 어떻게 전달할 것인가?
NSDiffableDataSourceSnapshot을 통해 데이터를 변경해준다. tableView.reloadData(), collectionView.reloadData() 함수 대신 dataSource.apply(snapshot)을 사용한다.
- 추후에 Menu 구조체 대신 String을 사용하였다.
private let list: [Section: [String]] = [.all: ["공지사항", "실험실", "버전 정보"],
                                         .personal: ["개인/보안", "채팅", "멀티프로필"],
                                         .etc: ["고객센터/도움말"]]

private func configureSnapshot(){
    var snapshot = NSDiffableDataSourceSnapshot<Section, String>()
    snapshot.appendSections(Section.allCases)

    for section in Section.allCases {
        snapshot.appendItems(list[section] ?? [], toSection: section)
    }

    dataSource.apply(snapshot)

}
4. 간단한 header 추가하기
아래처럼 CustomHeaderView를 만들어준다.
class SettingHeaderView: UICollectionReusableView {
    static let identifier = String(describing: SettingHeaderView.self)

    let titleLabel = {
        let object = UILabel()
        object.font = .systemFont(ofSize: 16, weight: .bold)
        object.textColor = .white
        return object
    }()

    override init(frame: CGRect) {
        super.init(frame: frame)
        configure()
    }

    required init?(coder: NSCoder) {
        super.init(coder: coder)
        configure()
    }

    private func configure() {
        addSubview(titleLabel)
        titleLabel.snp.makeConstraints { make in
            make.leading.equalToSuperview().offset(20)
            make.centerY.equalToSuperview()
        }
    }
}
collectionView.register로 headerView를 명시해준다
private lazy var collectionView = {
    let object = UICollectionView(frame: .zero, collectionViewLayout: createLayout())
    object.register(SettingHeaderView.self, forSupplementaryViewOfKind: UICollectionView.elementKindSectionHeader, withReuseIdentifier: SettingHeaderView.identifier)

    return object
}()
createLayout함수에 아래 코드를 추가해준다.
configuration.headerMode = .supplementary
configureDatasource에 아래 코드를 추가로 적어준다.
dataSource.supplementaryViewProvider = { (collectionView, kind, indexPath) -> UICollectionReusableView? in
    guard kind == UICollectionView.elementKindSectionHeader else { return nil }
    let header = collectionView.dequeueReusableSupplementaryView(ofKind: kind, withReuseIdentifier: SettingHeaderView.identifier, for: indexPath) as? SettingHeaderView

    header?.titleLabel.text = Section.allCases[indexPath.section].rawValue
    return header
}
완성된 UI

'🍎 iOS' 카테고리의 다른 글
| RxSwift vs Combine (0) | 2024.09.10 |
|---|---|
| RxSwift(1) (0) | 2024.07.30 |
| Method Dispatch (0) | 2024.07.15 |
| Design Pattern (0) | 2024.07.14 |
| MVVM Pattern(1) (0) | 2024.07.14 |